This post came about because I seriously needed to organize my digital photos. For years, I tried to keep them organized on my desktop but then came ‘the cloud’.
I never understood the cloud. All I knew is that it saved every photo ever taken across all my devices including my son’s iTouch. (Mamma Mia, that kid takes a lot of videos!)

Disclosure: Some of the links below are affiliate links that I have provided for your convenience. Click here to read my full disclosure policy.
So, in order to tame all my digital photos, I had to figure out how to gather them all in one place, get rid of photos I didn’t care for, and how best to back them up, “just in case”.
Below, I lay out how best to declutter and organize your digital photos using both a cloud-based application* and your desktop’s folders (in case the cloud isn’t your thing).
*I have a Mac and iPhone but most of the steps should work across most devices.
Using Cloud-Based Photo Apps
The first thing you will want to do is choose a cloud-based platform or application for all your digital photos and videos if you don’t have one.
Some popular ones are Google Photos, Dropbox, Everpix, Flickr, and SkyDrive. To learn more about photo applications click here.
If you are on the fence about using these applications, here are some pros to think about:
- saves digital photos ‘outside’ your devices, just in case your computer fatally crashes or you lose your smartphone
- uploads your photos to one central location (the cloud) allowing you to access them across all your devices
- most offer lots of storage for free
Now, while having this type of platform may sound good, your photos can and will create a digital nightmare if you let it.
When we use multiple devices for our photos without an organization system in place, photos begin piling up on our devices just as if they were made of paper.
And just like physical space, they begin taking up cyberspace on your devices and this can become costly.
So, let’s see if we can get your digital photos organized using one of the popular applications.
For this post, I chose Google Photos to declutter, save, stream, and yes, organize all my digital photos.
After a little research, it seemed to be the one that most sites recommend in terms of free storage and for its ease of use. What I liked was its “recognition” feature. You’ll see what I mean.
Organizing your Digital Photos in Google Photos
Download then Upload
Okay, so the first thing you will want to do is to download the Google Photos app onto all your devices.
After, start uploading your photos and videos to the main device you want to keep your photos. Usually, this is one’s desktop/laptop.
Depending on the number of photos/videos you have, this could take a while.
Between my personal photos, blog photos, and videos, it took about two days to upload everything. So, when you upload your photos, make sure your device is on a charger. Uploading drains batteries quickly.
If you own a digital camera, you’ll also want to upload any photos you have stored on an SD card.
Using Face Recognition
Once everything has been uploaded, it is time to get to work. This is where Google’s recognition feature comes in.
Google Photos has the ability to match faces and even items within a photo making organizing that much faster. It can even find photos by location.
So, to start, go up to the search bar at the top of the Google Photos window and just place your cursor in it. This step alone will take you to a search page with options to find photos by location and by face (person/pet).
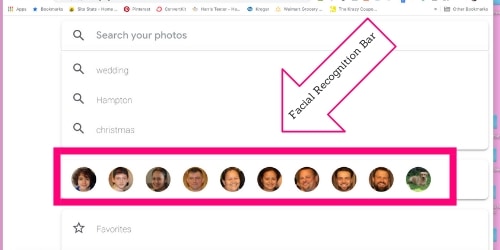
Now, if you click on the face image circles, the app will pull up images in which it has recognized a face.
If organizing this for the first time, a prompt will appear asking you to enter that person’s name so that they can tag all your photos accordingly. You can also do this with pets. How awesome is that?!
Now, this feature is not perfect but it comes pretty darn close. It can also go a little overboard too. I found that it was picking up face images from framed photos in the background of photos.
The good news is that if there are faces in photos you either don’t recognize or don’t care to tag, you can delete them.
Creating Albums for Your Digital Photos
I find the best way to organize hundreds of digital photos is to create digital albums. This process forces me to go through every photo I have so that I can delete photos I do not want or delete any duplicates. This will also help manage your storage space.
First, in the photo feed section, find a set of photos you want to put into an album.
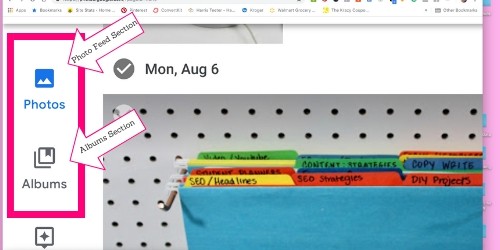
In the screenshot below, I have a set of pictures from my Office Organization post. When you click the date, it will select all the photos for that day.
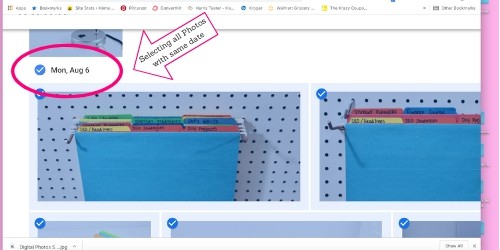
If you have photos for that date that you don’t want, just click the checkmark in the top left corner to deselect the photo.
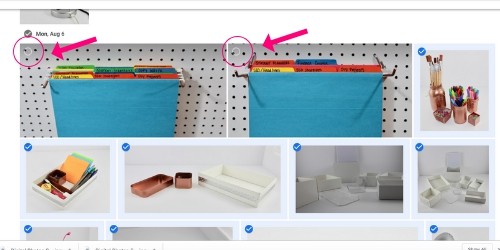
When you have the photos selected, click on the Create + button on the top bar (to the right of the search bar).
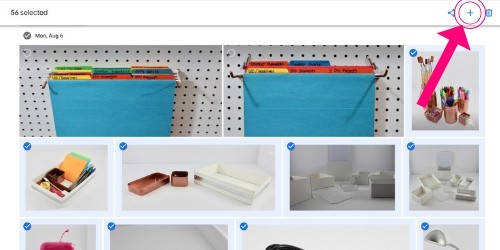
This will pull down a menu of options. The one you want is “Album”. Click on it to select it.
Naming Your Albums
This will bring you to the “Add a Title” prompt. This is where you will name your album.

You will want to name them something easy to remember. I like keeping my personal photos separate from my blog photos. So I name my blog photos “Blog: and post name”.
This way, when I search for blog photos, I can just enter “blog” in the search bar and it pulls up all my blog albums.
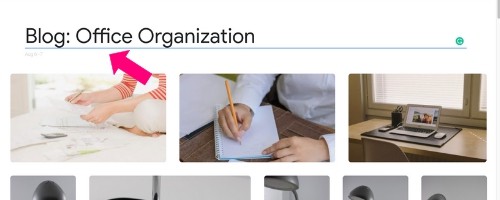
And that’s it. Now if I want to search for a blog album, I can type in ‘blog’. This pulls up a few albums.
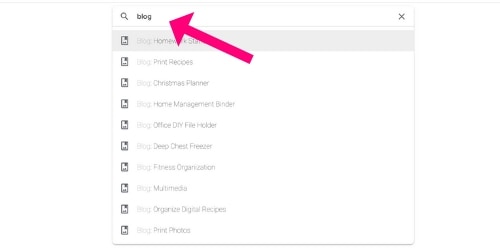
If I want to narrow down my blog albums. I just pick a word associated with a post like “Christmas” and it will only show those albums that deal with Christmas.

Archiving and Deleting
Now, once I have made an album, I go back to the photo feed section and archive the images I have placed into albums. This helps clear the photo feed without deleting my photos.
As you go through your photo feed, be selective and delete photos that are out of focus, duplicates, or that you just don’t care for. This will help you avoid using up your storage space.
To date, I am still organizing my photos. If you have lots of shots as I do, you will have to set some time aside every day to do this. Take it little by little. Don’t burn yourself out by organizing every photo in one day. Eventually, you will have all your photos organized.
Note that as you continue to take photos on your devices they will show up in your photo feed. So, try to visit your feed at least once a week so that they don’t end up clogging your feed and you’re left with hundreds of photos to organize again.
Saving Digital Photos on Your Desktop/Laptop
If you prefer not to use cloud-based apps, then the next best way to organize your photos resides on your desktop. This means organizing your photos using folders.
Now, I also keep photos on my desktop. Because I do the bulk of my work on my laptop, I need to have access to my photos especially if the internet goes down (and this happens often in my area).
The only drawback of using your desktop/laptop to store your photos is that it will cost you some of your computer’s storage space. So again, be selective with your photos. Personally, I only keep three years’ worth of photos on my computer. I’ll go over where you should keep older photos later.
Organizing with Folders
To organize your photos on your desktop, start by creating a folder for each year of pictures you have. Below are three photo folders on my desktop.
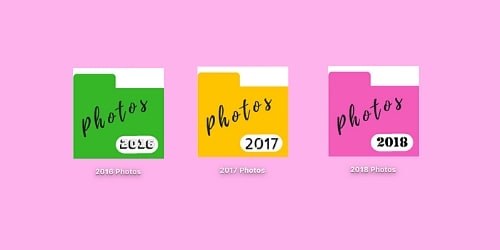
Next, start dragging photos into the appropriate year folder. Once you have done this, the next step is to organize the photos within each of the folders. You will want to create additional folders within the folder. Below are some suggestions for naming your folders as you organize them:
- each month of the year
- special events like birthdays or weddings
- seasonal events like summer vacation or spring break
- and by the person, especially if you have lots of shots of an individual
Below is a screenshot of my folders within the 2016 folder.
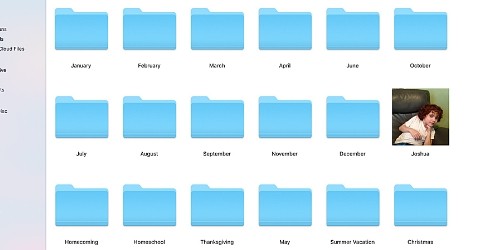
By the way, that is technically not a photo of my son. I use Canva to create folder covers. This particular folder is full of images of Joshua so I used a photo as a folder cover.
Once you have organized all your photos on your desktop, it’s time for you to do one other thing.
Backing Up Your Digital Photos
The most important thing you can do for your digital photos is to back them up to an external hard drive even if you use a cloud-based application.
While I love Google Photos you never know what will happen in the future. Like any business, these applications can become defunct so it is best not to rely on them solely.
External Hard Drives
Using an external hard drive will not only save your photos if your computer crashes but it can also store older photos so that they don’t take up much-needed space on your computer’s internal hard drive.
So, get into the habit of backing up your photos on a regular basis. Then, at the start of every year, back up your photos one more time, then delete your oldest photo file on your desktop. For example, when 2019 rolls in, I will back up all my photos and then delete my 2016 folder.
Now, I use flash drives for storage because they are small and I can fit them easily in our fireproof box for safekeeping.
I only hope that flash drives stick around long enough and do not go the way of floppy disks. That is my only concern about using them. However, if this does happen and I need to store my photos elsewhere, having them already organized should make any transfer easy.
Let’s Get Organized
And with that, it’s time to start organizing your digital photos, the sooner the better. So remember:
- choose a reliable cloud-based app so you can centralize all your photos in one location
- if you prefer having them on your desktop, organize them in folders
- and lastly, back up your photos onto an external hard drive for safekeeping
Have print photos that need organizing too? Click here to read how you can organize your precious keepsakes.
Have another way you organize digital photos? Leave a comment below and let me know.

hi! thank you for all the tips. on google photos, do you know how to only view the images that are not in folders?
my phone does this, as they are moved from “camera” to the categorized album. on Google photos, I can’t tell which ones I’ve already put in a folder, as they are ALL there when I click on library. this makes me jump all over trying to add photos to folders. any suggestion?
Hi Jessie,
To find photos you have already organized into files/albums, simply hit the search icon on the bottom right. In the search bar on top, you can enter someone’s name or use a simple word like “sunsets” and google photos will take you to those photos that are in your library and albums.