Maximize Space in Your Child’s Room with This Clever Corner Unit for Books
Looking for a space-saving way to display your children’s books?
Are you looking for something unique and easy to put together?
Follow our step-by-step instructions for putting this creative bookcase together.
It is a clever way to use vertical space in an unused corner.
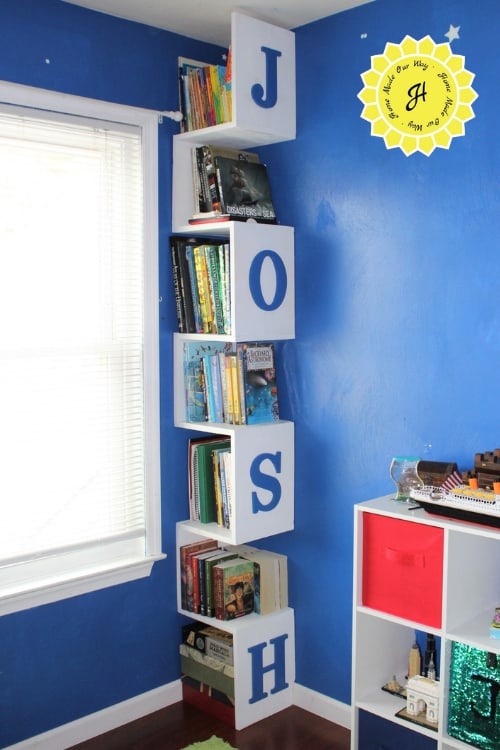
My Josh is a bookworm.
He absolutely loves every one of his books, but he also has the smallest room in the house.
Needless to say, his room seemed to stay cluttered even if we cleaned it.
Books were everywhere.
Everywhere except this one corner of his room which always remained empty because, well, it’s a corner.
So I did what most people do.
I headed to Pinterest for some ideas.
After seeing a few vertical bookcases, I got down to work and designed something similar to what I had seen.
I wanted something simple, but most of all, I wanted something that would store lots of books and didn’t take up much room.
Thus, Josh’s corner bookshelf tower was born.

Disclosure: This post contains some affiliate links for your convenience (which means if you purchase after clicking a link, I will earn a small commission, but it won’t cost you a penny more)! Click here to read my full disclosure policy.
***This bookshelf is approximately 8 feet tall. When installing, have someone assist you.***
If you want the DIY plans for this bookshelf, just scroll to the end of the post and click the pink button.
Bookshelf Materials
- 2 – 1″ x 12″ x 8′ wooden boards
- 36 – 1 ½” #10 wood screws
- 6 – 2″ #10 wood screws
- 2 – L-shaped metal brackets
- paint (color of your choice for the bookshelf)
- paint (color of your choice for letters or other designs)
- wood glue
- sandpaper
- 1 – quarter round (usually comes in 8′ pieces)
- wooden letters (if planning to use name design)
- spackle/putty
Tools You’ll Need
- tape measure
- circular saw
- drill
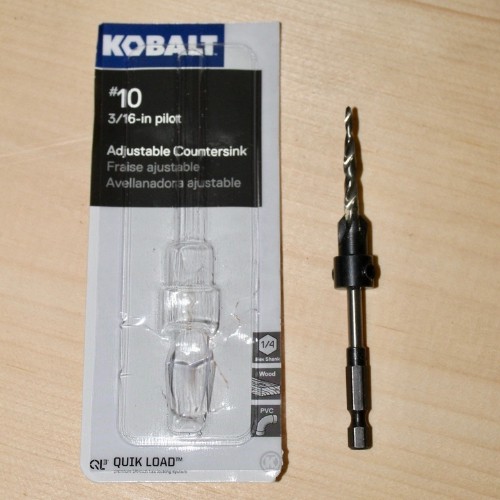
- adjustable countersink – #10 (3/16″ pilot)
- paintbrushes
- putty knife
- finishing nails
- hammer
- stud finder
- ladder
Taking Measurements
The first thing you should do is measure the corner where you’d like to install your bookshelf.
This includes measuring from the floor to the ceiling.
For most homes, this measurement is usually 8 feet, but it’s best to make sure.
In Josh’s room, we had to consider the window frame near that corner so that we didn’t make the
With measurements in hand, it’s time to sketch your bookcase design.

Sketching Your Bookcase Design
The next thing you want to do is sketch out your bookcase and choose a design.
If you want to use the same measurements we did, then you will need to cut your wood pieces to the following measurements:
- (4) ‘letter’ boards are 11½” wide x 14″ tall (that still leaves about an inch from the ceiling)
- (6) horizontal boards are 11½ wide x 12″ long
- (3) vertical non-letter boards are 11½” wide x 13½” tall
Remember that these measurements allowed for only 4 letter fronts.
If you plan on adding a letter, then you don’t want to use these measurements.
However, let me caution you that you need to consider the height of your books.
This is why we made the vertical boards at least 13½” tall.
If you are unsure, go through your child’s books, find the tallest ones, and adjust your measurements.
Keep in mind that if you don’t plan to adjust this later, you should use the tall measurements we used.
*To help you with this part, consider using our project planner printable located in our online resource library.
Other Bookshelf Design Ideas
Now, if you have a child whose name just can’t be shortened to 4 letters, consider other designs like those below:
- butterflies and birds
- dinosaurs and animals
- unicorns
- outer space-related designs
- flower designs
- sea-related designs
The design possibilities are endless. You can even add a design that specifies the genre of books for that particular
For example, use a princess silhouette or unicorns for fairy tales, or a boat or anchor for sea adventures.
Again, endless ideas…If your child has three letters in their name or nickname, then just add a design on the top or bottom front piece.
And don’t think it has to be a single design.
You can find unpainted wooden cutouts on Amazon, Etsy, and in most craft stores.
Purchase a few, paint them in different colors, and add them all to a front piece.
Get creative for this task and come up with unique and clever designs for the style you want.
By the way, these letters I purchased are 8″ tall x 5½” wide and about ¼” thick.
Assembling the Bookshelf Tower
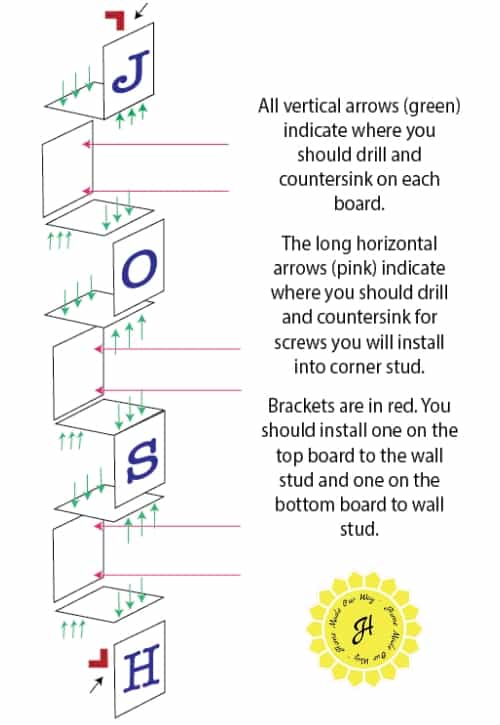
To help with the prep and assembly of the bookshelves, use the exploded diagrams below.
To get a copy of these diagrams, just visit our resource library.
Again, to gain access, just click the pink button at the end of the post.
Cutting Shelf Pieces and Prepping Them
First, cut the wooden planks using the measurements you have come up with for your design.
Again, if you are using the exact plan as our tower, then you should have 13 pieces altogether.
See the diagram below for measurements of each piece.
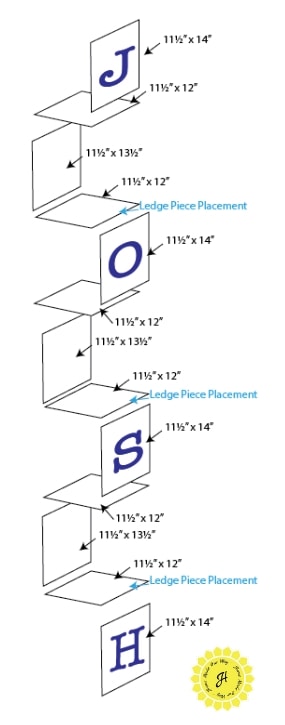
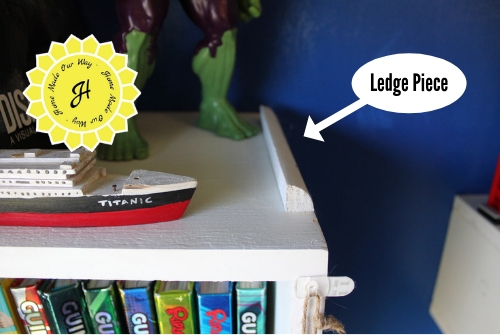
You will also want to cut pieces for the ledges out of the quarter round.
These will keep the books from falling off the open-ended tiers.
Our ledges were 8″ long, but you can make them go from end to end (11½”) if you like.
It’s up to you.
*If you plan on painting the ledges, you may want to do this now before fastening them to the boards.
Next, pre-drill all screw holes using the countersink on ONLY the 6 horizontal boards.
Then pre-drill two screw holes on each of the 3 back vertical boards.
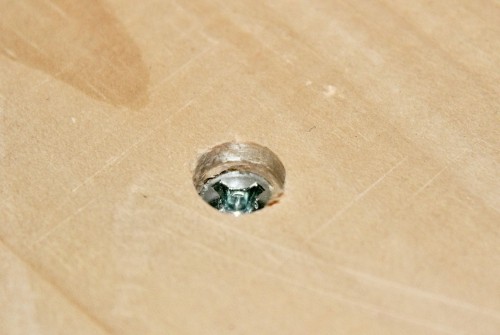
Note the diagram below. All pre-drilled holes are vertical, as indicated by the green arrows.
Now, before you assemble the pieces, go ahead and sand every surface.
Assembling Bookshelf Pieces
Before assembling your pieces, make sure to lay them out from top to bottom, especially if they have different dimensions.
Next, assemble the shelves.
Run a bead of wood glue across the surface where the two pieces meet.
Then screw them together.
Some glue may seep out as you fasten the pieces to each other.
Just wipe off any excess.
Once you are done assembling, let the glue dry overnight.
Prepping and Painting the Shelves
After the glue has dried overnight, go ahead and sand to smooth any areas where glue has seeped out or where you wiped off any excess glue the previous day.
Then, hammer in the quarter-round ledge pieces on the open-ended horizontal tiers.
These will cover some of the countersink holes.
Next, go ahead and putty over any exposed countersink/screw holes.
Again, let this dry overnight.
Now that the putty has dried, go ahead and sand these areas to smooth the surface again.
Once you have finished sanding, begin painting your shelves.
This may take all day as you will have to wait for the surfaces to dry before turning the shelves to access other areas that will need painting.
Go ahead and paint any design accessories you plan on adding to the front pieces as well.
Let all the pieces dry overnight.
Lastly, if all the pieces have dried well overnight, glue your design accessories to the front vertical pieces of your book tower.
Depending on how thick your designs are, you may have to nail them in with finishing nails.
Installing Bookshelf into Corner
As I stated earlier in this post, this is a very tall and weighty project.
Have someone help you carry and install your bookshelf.
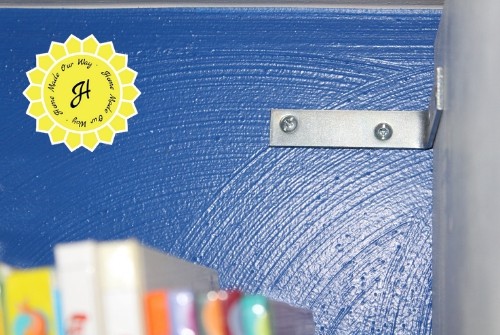
Once you have your bookshelf in place, go ahead and mount it to the corner’s wall stud.
Using the diagram above as a guide, secure the
Next, to give yourself some peace of mind, attach the top and bottom pieces to the wall using the L-brackets.
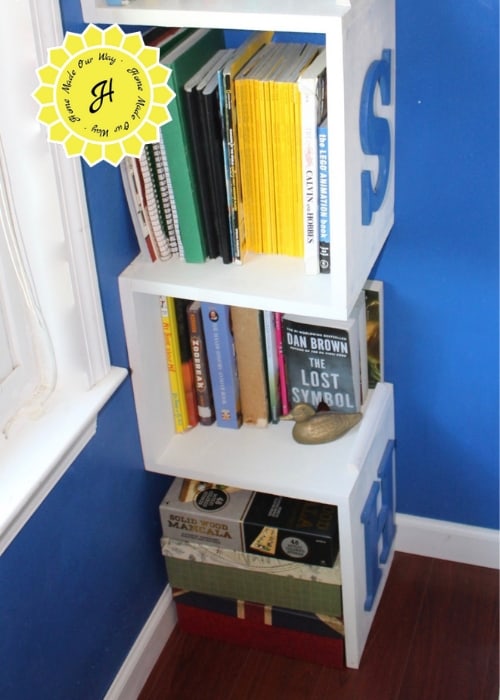
Adding Books
Finally, it’s time to add books.
Because this is a very tall
These are books he no longer reads but isn’t ready to part with.

We’ve made it very clear to him that he is not to try and climb the tower to access these books.
If he wants a book from the top
I suggest you do the same with your child(ren), especially if you have a daredevil.
Continue adding books to the shelves and keep the most read ones within reach.
For Joshua, these are his Guinness Records Books and other History and Science Textbooks.
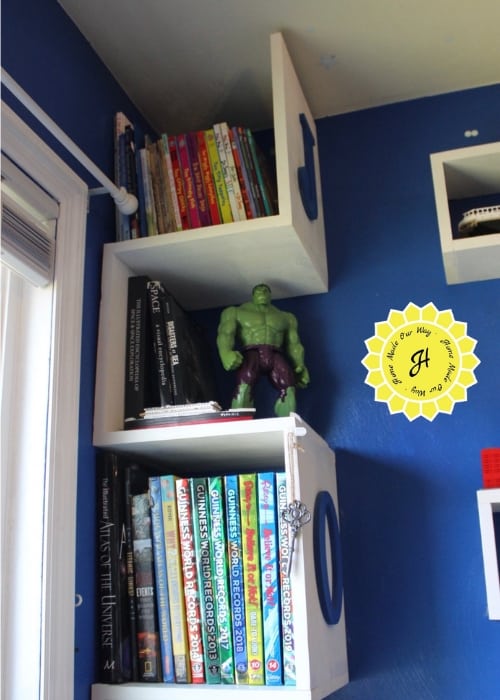
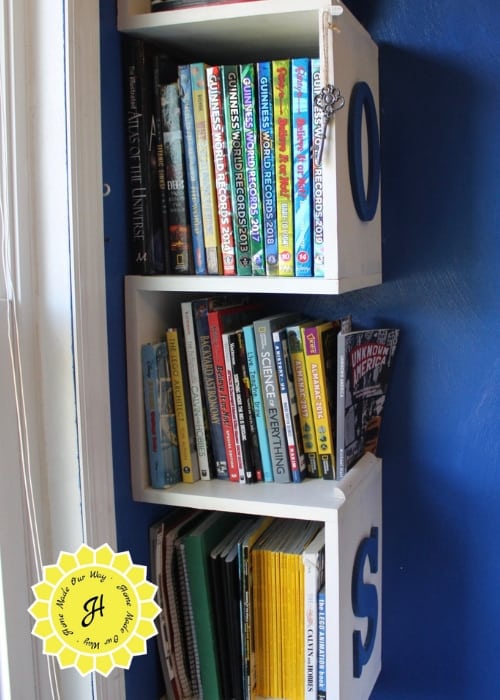
Because there is no bottom
They fit perfectly in this space.
Final Thoughts on the Corner Bookshelf DIY
So, to sum up, remember:
- take careful measurements before cutting your pieces
- get creative with your tower fronts
- use the diagram/plans available on this page and in our resource library. Click the pink button below
- schedule accordingly; this is at least a 4-day project
- be sure you have the space to deal with and store your tower for at least 4 days
- have someone help you carry and install your bookcase
- remember to talk with your child(ren) about accessing out-of-reach books
Other DIY Related Articles
Check out our other DIY projects and related organizing posts below:
- DIY Pegboard File
- Organizing Your Book Collections
- How to Create a Reading Nook [Out of a Small Space]
- Child’s Room Organization

Such a cool project. It turned out great!
Thanks Nickesha!